Over the past few years, I’ve delved into the minutia of git and git internals. Specifically, in my git internal series, I showed how to create an entire repository from scratch using echo and low-level commands such as git hash-object.
In many instances, understanding the concepts of git can help us know when things go wrong – for example when you do something you didn’t want to do, and you just want to go back in time. I call these git disasters “gitsasters.”
I have written a two-part blog series to help you feel confident when things go wrong in git. Here’s what I mean: when someone commits to the wrong branch, they will call you, and you will be able to help out; when a team member loses important changes they have made, you will be the person to consult with.
These things happen all the time, and those of us who understand how git works under the hood remain calm and just figure out what’s going on. Those who don’t have this more nuanced understanding of git look at it as a magical black box.
So let’s get started and deepen our understanding of git while acquiring new tools, especially for rewriting history. I will also be applying these tools to real-life scenarios.
Recap – recording changes in git
I’m quickly recapping the process of recording changes to a git repository which I have also covered in a previous post if you want a more thorough overview.
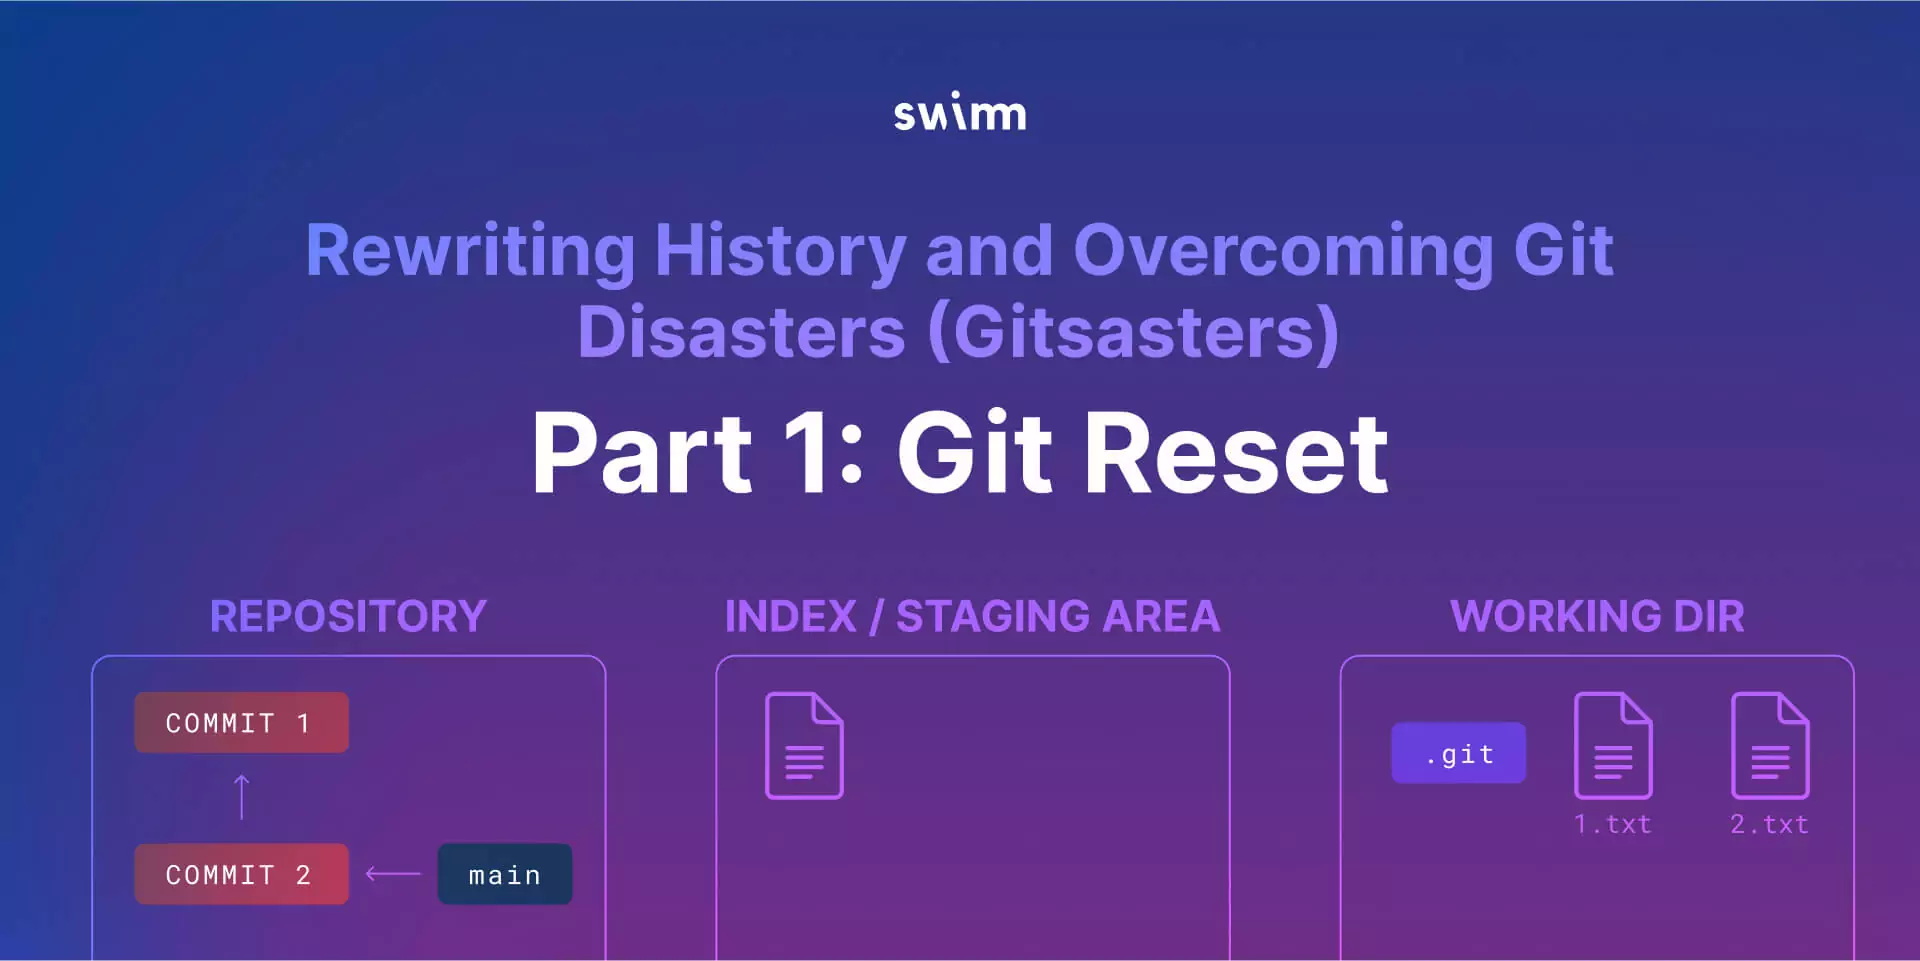
When you work with git, you’ll always have a working tree. A working tree is any directory on your filesystem with a repository associated with it. A repository is a collection of commits, each of which is an archive of how the project’s working tree looked like at a past date, whether on your machine or someone else’s. It also defines other stuff – like HEAD, branches, or tags.
Unlike other similar tools you may have used, git does not commit changes directly from the working tree into the repository. Instead, changes are first registered in the index or the “staging area.” You can think of the index as a way of “confirming” your changes, one by one, before doing a commit – which records all the approved changes at once.
Think of these states as three different trees – the working tree, the index, and the current commit in the repository.
Creating a repo with an initial commit
As you can see, I’ve created a repository and created within it a file called 1.txt, with the content of hello.
Question: where is this file now, referring to the three trees I mentioned earlier?
Answer: It is in the working directory – the same directory with the .git directory. To confirm that – make sure to use dir /a, as it is hidden.
Note that 1.txt is untracked – as git never included this file in its index.
You can verify that, of course, by using git status:
Now let’s add it to the index:
Finally, let’s create a commit object to include the file in a commit object in the repository.
You’ll notice now that all states are the same: the working dir’s state is the same as the staging area and the same as the current commit of the repository which HEAD points to.
You can create a repository without using porcelain commands such as git init, git add or git commit, as discussed in a previous post. Today, rather than focusing on how these commands are implemented, I’m showing you how to reverse or undo them.
In the repo I created above, you’ll see your first commit, with the SHA-1 of
e317f16e5b6ce08bc77b36008e10082276b051d4. Let’s give it the nickname “Commit 1”.
Now let’s create another commit that will include another new file:
The new commit is now in the working directory, and the next step is to add it to the index:
Now create a new commit:
With “git commit,” there are two things to note:
- You created a new commit object, this time the one with the SHA-1 value of
c890ca6432c0d54826b941c45a699b8a3c02f4d0, that we’ll call “Commit 2.0”. - “Git commit” also moved the pointer of the active branch – in this case main – to point to the newly created commit.
Note that currently, “Commit 2.0” is also what HEAD points to, and you can verify that using the command git rev-parse:
This gives us the SHA-1 of “Commit 2.0”.
Don’t forget that you can also use some cool git syntax to refer to commits relative to other commits. For example, if you refer to HEAD~1 – you are referring to the direct parent of HEAD, which in this example would mean “Commit 1”.
Let’s verify that here:
You can undo your actions using the super-powerful command, git reset. The command git reset has three main modes: soft, mixed, and hard.
git reset: step 1
Regardless of the move, the first step of git reset is to move whatever HEAD is pointing to. If you use the soft mode – git reset --soft – it will simply stop there.
For example, let’s use git reset --soft HEAD~1. This tells git to move whatever HEAD points to – in this case, the branch main – to point to HEAD’s parent, “Commit 1”.
Next, run this command and then use git log to examine what happened.
You can see that git goes to HEAD, sees that it points to main, which now points to “Commit 1”. So the commit we’re calling “Commit 2.0” is not reachable from this history.
If you’re asking whether it still exists in git, the answer is yes. If you use the plumbing command git cat-file -p, you can see that it is still there.
What about git status? Let’s check:
You can see that 2.txt is now in the staging area. Of course, it is also in the working tree. However, it is not present in the active commit, as you changed the active commit – that is, HEAD now points to main, which in turn points to “Commit 1”, rather than “Commit 2.0”.
Note that git reset --soft did NOT change HEAD. In other words, HEAD itself still points to main branch. However, what HEAD pointed to – the main branch – changed.
In other words, git reset --soft allowed us to undo the last step of introducing changes – using the git commit command. You are now back to where you were before committing, with only one difference: the git commit object has been created and resides within git’s internal database.
So, if you use git reset --soft, the operation ends here.
git reset: step 2
The second step of git reset is to update the Staging Area to be the same as what HEAD points to.
To demonstrate, first recreate the last commit:
I’ll name this commit “Commit 2.1” as the tree it references is exactly the same as the original “Commit 2”, except that it has a different timestamp and a different SHA-1 value.
Now you can use git reset --mixed HEAD~1.
Here’s what’s happening:
- The first step,
HEADnow points to “Commit 1”. That’s wheregit reset --soft HEAD~1stopped. You can see that withgit log:
This looks the same as when you used the --soft switch.
- The second step:
git resetupdates the staging area to the snapshot thatHEADnow points to. Currently,HEADpoints tomain, which in turn points to “Commit 1”.
Let’s verify that:
You can see that now 2.txt is no longer a part of the staging area. It is, however, a part of the working tree.
As a result of running git reset --mixed, the status of the active commit is the same as the status of the staging area, and they are different than the status of the working tree.
By specifying --mixed, git reset stops at this point. This is also the default switch for git reset.
git reset: step 3
In the third step, git reset makes the working directory look like the index (again, I use the terms index and staging area interchangeably). If you use the --hard option, then git reset will continue to this stage.
Let’s see how this looks. First, recreate “Commit 2”. This time, you need to add 2.txt to the index again and then commit. Then, run git log again.
And of course, git status is clean, as again the three states are the same – the working tree, the index, and the active commit all look the same.
Now let’s use git reset --hard HEAD~1. This will first go through the two first steps.
Whatever HEAD was pointing to, in your case – main branch, is now pointing to what used to be HEAD~1, that is, “Commit 1”. This is where git reset --soft stops.
You can see this by using git log.
Next, git reset updates the index to be the same as what HEAD currently points to after the first step.
So in our example, the index no longer includes the file 2.txt. That’s where git reset --mixed stops.
In the third step, git reset updates the working directory to be similar to the index. In this case, it means the working dir no longer includes the file 2.txt. You can verify that if you use git status.
You can also see this by looking directly at the file system.
You can see that indeed 2.txt is no longer there.
Applying git reset to git disasters (gitsasters)
Hopefully now you’re convinced that git reset tool is a superpower for coding. But to really understand why, I want to show you how it can be applied in your daily work, with mini gitsasters.
Gitsaster scenario #1
Consider this scenario: you started with the file 1.txt, which was committed in “Commit 1”. Now you want to create the file 2.txt, and add and commit it:
Oh, but wait, I forgot one thing: I wanted to write that actually Swimm is AWESOME into that file.
Of course, I can just create a new commit and add it to the commit history, but that would mean that this “Commit 2.3” is just a mistake, and I’d much prefer to avoid that.
So how can I undo it?
One way would be to use git reset --soft HEAD~1. By doing that, you undo the last operation of making HEAD point to the new commit.
I can now make changes to 2.txt.
Now you can now add it to the index and commit. As a result, you’ll have a clean history.
Gitsaster scenario #2
Here’s another scenario: let’s say you introduce another change by creating another file and then add and commit it.
Oops again! You inadvertently committed it to the main branch when you wanted the commit to be on another branch – a feature branch.
You actually want your commit history to look like this, where the main branch does not include “Commit 3” – but rather a new feature branch includes it.
This is an elementary example, and I can simply just undo the creation of 3.txt altogether, and then recreate it. But in many instances, you will have already made many changes and introduced them in a commit to the wrong branch. I can assure you that you’ll want to skip making all the changes again when you can just commit to a new branch.
So let’s use what we’ve learned so far to fix this.
Draw the states and consider them carefully. You should remember that what you have here is commit objects and pointers to them and that you can manipulate them using the tools you’ve acquired.
Notice that there are three main differences between the states:
- where
mainpoints to - the existence of
feature_branchand where it points to - where
HEADpoints to.
Let’s deal with them one by one.
First, you can create feature_branch. Here’s how: by simply using git branch feature_branch, you are doing just that by creating a pointer by the name of feature_branch. It also points to “Commit 3” – which is what you want.
Second, change the main branch. You want it to point to the previous commit, “Commit 2.4”.
Now main points to “Commit 2.4”. Notice that the state of the index and the working directory have been changed to match the state of “Commit 2.4”.
Very cool, if I say so myself 😎😎.
What is left to do is to update HEAD to point to your feature_branch. To do this, you can simply use git checkout.
And so – you have reached the desired state!
How cool is that? By using git reset, as well as simple commands such as git checkout or git branch, you can change the repository’s state to precisely what you want it to be.
Gitsaster scenario #3
Let’s consider one final scenario by introducing two changes together. First, create a file by the name of 4.txt, and change the contents of the existing 3.txt. You will commit these two changes together.
As a result, you now have a new commit with a clean status.
Another oops – cause you didn’t want these two changes to be introduced in a single commit! You can now use the tools we have acquired here to split your changes into two, separate commits.
Here’s how: you can undo the last commit by using git reset. For this case, the most convenient way would be to use the --mixed switch.
So now the repository is back to where it was, with “Commit 3” being the last one. Also, the index resembles “Commit 3” yet the working dir includes your changes. You can now add them to the index and commit them separately.
Now you have two separate commits.
Again, you were able to use git reset to easily modify your history and match the state you want it to be.
If you’re sighing a relief to know how to do this, I’m very much with you on this one!
Bottom line
Let’s pause and summarize: you now have experience with the command git reset, together with its three modes:
--soft, that moves whateverHEADis pointing to--mixed, that goes on to update the index to whatHEADis pointing to after thesoftstep--hard, which updates the working dir to match the state of the index.
In addition, in applying your knowledge to a few git disaster scenarios, I hope you have a better understanding of how git works and feel way more confident fixing cases where you really need to rewrite some code history without it being a huge headache.
Here’s a sneak peek at my next post: you’ll acquire additional tools to deal with gitsasters, including learning how to undo cases where you regrettably push your changes to the remote and/or you regrettably use git reset --hard to rewrite history.
If you have not yet had a chance to check out Swimm’s platform, I encourage you to have a look. There’s a growing community of users around the world who are benefiting from Continuous Documentation via Swimm. To see Swimm up close, sign up for a 1:1 Swimm demo.